Using a shader from The Book of Shaders in Effect Composer
This tutorial describes how you can use a shader from The Book of Shaders to create a custom effect to use in the Qt Design Studio Effect Composer, and how you can adjust the code to create new features.
To create the custom effect, you will use the the shader code from the 2D Noise example:
#ifdef GL_ES
precision mediump float;
#endif

uniform vec2 u_resolution;
uniform vec2 u_mouse;
uniform float u_time;

// 2D Random
float random (in vec2 st) {
    return fract(sin(dot(st.xy,
                        vec2(12.9898,78.233)))
                * 43758.5453123);
}

// 2D Noise based on Morgan McGuire @morgan3d
// https://www.shadertoy.com/view/4dS3Wd
float noise (in vec2 st) {
    vec2 i = floor(st);
    vec2 f = fract(st);

    // Four corners in 2D of a tile
    float a = random(i);
    float b = random(i + vec2(1.0, 0.0));
    float c = random(i + vec2(0.0, 1.0));
    float d = random(i + vec2(1.0, 1.0));

    // Smooth Interpolation

    // Cubic Hermine Curve.  Same as SmoothStep()
    vec2 u = f * f * (3.0 - 2.0 * f);
    // u = smoothstep(0.,1.,f);

    // Mix 4 corners percentages
    return mix(a, b, u.x) +
            (c - a) * u.y * (1.0 - u.x) +
            (d - b) * u.x * u.y;
}

void main() {
    vec2 st = gl_FragCoord.xy/u_resolution.xy;

    // Scale the coordinate system to see
    // some noise in action
    vec2 pos = vec2(st * 5.0);

    // Use the noise function
    float n = noise(pos);

    gl_FragColor = vec4(vec3(n), 1.0);
}
Adding a new custom effect for the shader
First, you need to add a new custom effect to your composition in Effect Composer. Later, you will copy the shader code to this custom effect.
To add a custom effect to your composition:
- In Qt Design Studio, open the Effect Composer view.
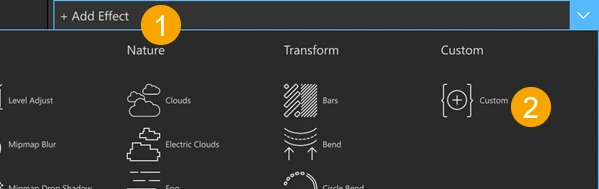
- From the Add Effect dropdown menu (1), select Custom (2). The custom effect node is an empty effect node.
Copying the shader code to Shaders Code Editor
Next, you will copy the shader code and paste it to the Fragment Shader tab of Shaders Code Editor with some adjustments:
- Copy the functions of the shader and paste them above the
@maintag:// 2D Random float random (in vec2 st) { return fract(sin(dot(st.xy, vec2(12.9898,78.233))) * 43758.5453123); } // 2D Noise based on Morgan McGuire @morgan3d // https://www.shadertoy.com/view/4dS3Wd float noise (in vec2 st) { vec2 i = floor(st); vec2 f = fract(st); // Four corners in 2D of a tile float a = random(i); float b = random(i + vec2(1.0, 0.0)); float c = random(i + vec2(0.0, 1.0)); float d = random(i + vec2(1.0, 1.0)); // Smooth Interpolation // Cubic Hermine Curve. Same as SmoothStep() vec2 u = f * f *(3.0 - 2.0 * f); // u = smoothstep(0.,1.,f); // Mix 4 corners percentages return mix(a, b, u.x) + (c - a) * u.y * (1.0 - u.x) + (d - b) * u.x * u.y; }
- Copy the code inside
void mainand paste it below the@maintag, inside {}. - Edit the uniforms of the original shader code in Shaders Code Editor as follows:
uniform vec2 u_resolutiontoiResolutiongl_FragCoordtofragCoordgl_FragColortofragColor
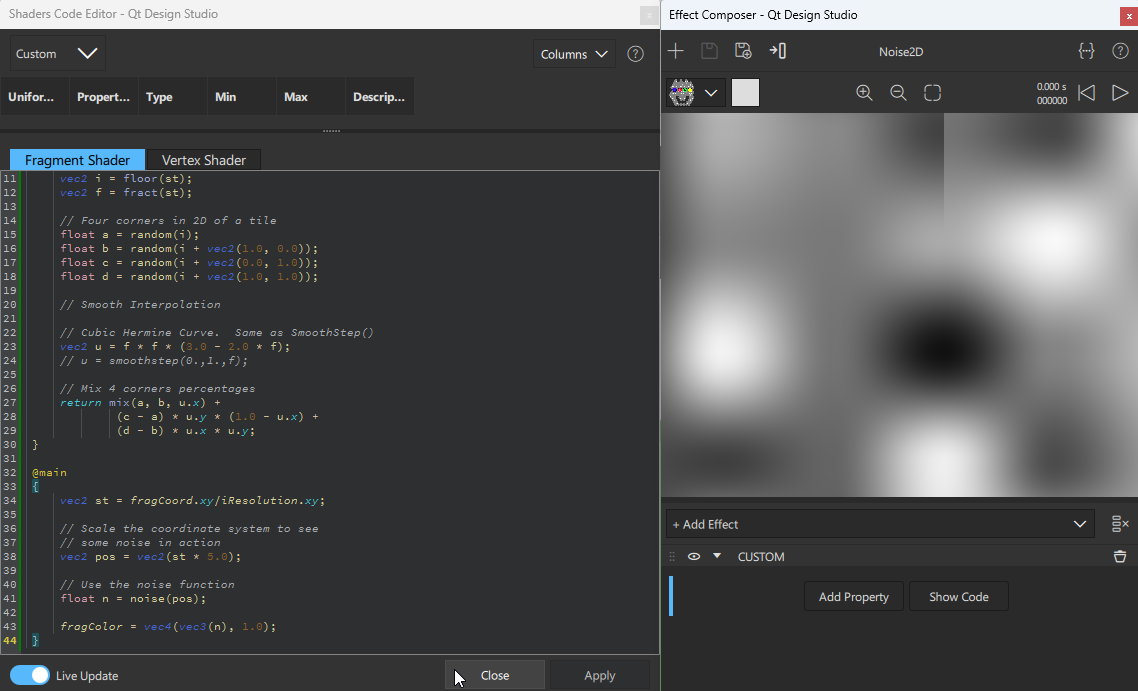
The code in Shaders Code Editor should now look like this:
// 2D Random
float random (in vec2 st) {
    return fract(sin(dot(st.xy,
                        vec2(12.9898,78.233)))
                * 43758.5453123);
}

// 2D Noise based on Morgan McGuire @morgan3d
// https://www.shadertoy.com/view/4dS3Wd
float noise (in vec2 st) {
    vec2 i = floor(st);
    vec2 f = fract(st);

    // Four corners in 2D of a tile
    float a = random(i);
    float b = random(i + vec2(1.0, 0.0));
    float c = random(i + vec2(0.0, 1.0));
    float d = random(i + vec2(1.0, 1.0));

    // Smooth Interpolation

    // Cubic Hermine Curve.  Same as SmoothStep()
    vec2 u = f * f * (3.0 - 2.0 * f);
    // u = smoothstep(0.,1.,f);

    // Mix 4 corners percentages
    return mix(a, b, u.x) +
            (c - a) * u.y * (1.0 - u.x) +
            (d - b) * u.x * u.y;
}

@main
{
    vec2 st = fragCoord.xy/iResolution.xy;

    // Scale the coordinate system to see
    // some noise in action
    vec2 pos = vec2(st * 5.0);

    // Use the noise function
    float n = noise(pos);

    fragColor = vec4(vec3(n), 1.0);
}
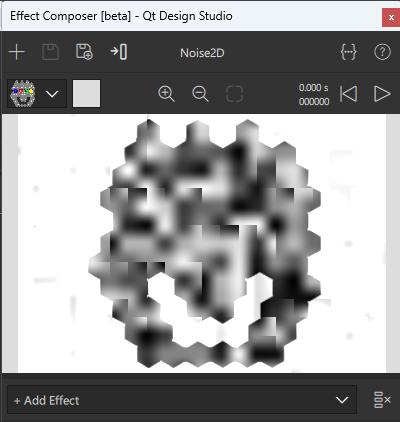
You should now see the effect in the preview window of the Effect Composer view:
If you don't see the effect, ensure that Live Update is selected. To update the preview window manually, select Apply.
Select  to run the animation in the preview window.
Adjusting the shader code
Next, you will make some adjustments to the code in Shaders Code Editor to fine-tune the shader.
Controlling the opacity
To control the opacity, you will replace the number in the fragColor with a uniform, create a float property, and assign that to replace the number.
First, create a new float property for the custom effect:
- Select Add Property.
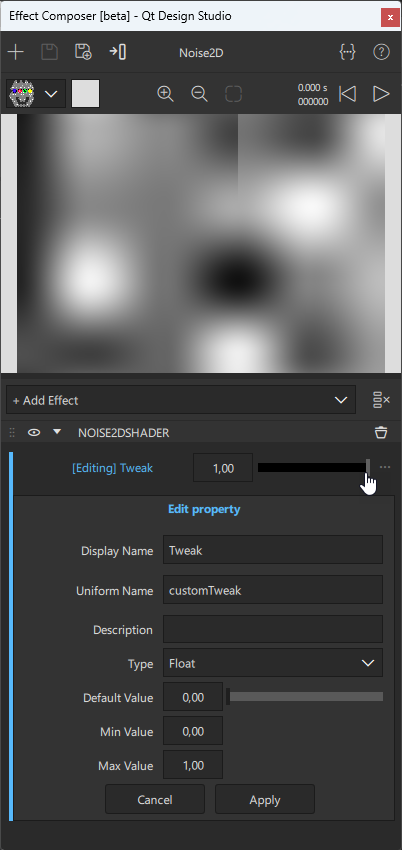
- For Display Name, enter Tweak.
- For Uniform, enter customTweak (if this hasn't been done automatically).
- Select the dropdown menu for Type, and then select Float.
- For Max value, enter 1.
- Select Apply.
Next, to assign the customTweak property to replace the number defining opacity, edit fragColor = vec4(vec3(n), 1.0); to fragColor = vec4(vec3(n), customTweak);.
The code below the @main tag in Shaders Code Editor should now look like this:
@main
{
    vec2 st = fragCoord.xy/iResolution.xy;

    // Scale the coordinate system to see
    // some noise in action
    vec2 pos = vec2(st * 5.0);

    // Use the noise function
    float n = noise(pos);

    fragColor = vec4(vec3(n), customTweak);
}
You can now adjust the effect transparency with a slider:
Controlling the noise granularity
To change the noise granularity, you will add a property to control the value.
First, create a new float property for the custom effect:
- Select Add Property.
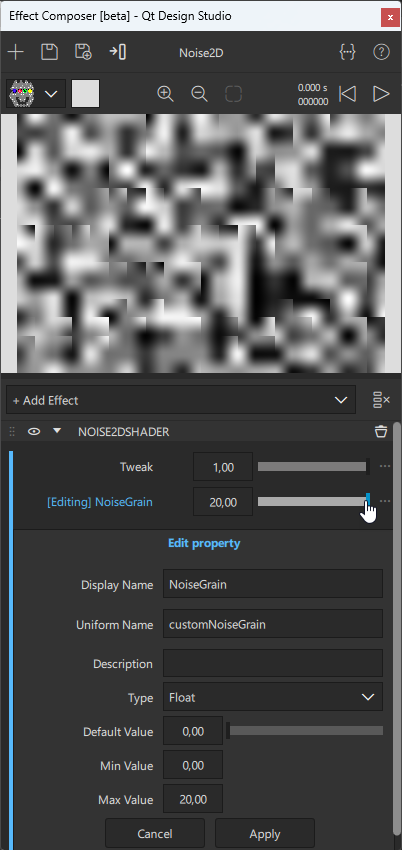
- For Display Name, enter NoiseGrain.
- For Uniform, enter customNoiseGrain (if this hasn't been done automatically).
- Select the dropdown menu for Type, and then select Float.
- For Max. value, enter 20.
- Select Apply.
Next, to assign the customNoiseGrain property to replace the number defining granularity, go to Shaders Code Editor, and edit vec2 pos = vec2(st * 5.0); to vec2 pos = vec2(st * customNoiseGrain);.
After this change, the code after the @main tag in Shaders Code Editor should look like this:
@main
{
    vec2 st = fragCoord.xy/iResolution.xy;

    // Scale the coordinate system to see
    // some noise in action
    vec2 pos = vec2(st * customNoiseGrain);

    // Use the noise function
    float n = noise(pos);

    fragColor = vec4(vec3(n), customTweak);
}
You can now adjust the noise granularity with a slider:
Using the effect to mask an object
To use the effect to mask the component it is assigned to, edit fragColor = vec4(vec3(n), customTweak); to fragColor = vec4(vec3(n), customTweak * fragColor.a);.
The code after the @main tag in Shaders Code Editor should now look like this:
@main
{
    vec2 st = fragCoord.xy/iResolution.xy;

    // Scale the coordinate system to see
    // some noise in action
    vec2 pos = vec2(st * customNoiseGrain);

    // Use the noise function
    float n = noise(pos);

   fragColor = vec4(vec3(n), customTweak * fragColor.a);
}
After this final change, the preview window should look similar to this:
See also Effect Composer, Effect Composer example, and Working with shader code in Effect Composer.
Available under certain Qt licenses.
Find out more.
