Using a shader from Shadertoy in Effect Composer
This tutorial describes how you can use a shader from Shadertoy to create a custom effect to use in the Qt Design Studio Effect Composer.
To create the custom effect, you will use the Moving bars shader code:
const float pi = 3.14159265;

vec3 blurry_rectangle(vec2 p, float xEdgeWidth, float yEdgeWidth, float xBlurriness, float yBlurriness, float xOffset, float yOffset) {
    // the blurry rectangle mask
    p -= vec2(xOffset, yOffset);
    float smoothFrequency = 1.0;
    vec2 innerEdge = vec2(xEdgeWidth, yEdgeWidth) - vec2(xBlurriness, yBlurriness);
    vec2 outerEdge = vec2(xEdgeWidth, yEdgeWidth) + vec2(xBlurriness, yBlurriness);
    vec2 bl = smoothstep(innerEdge, outerEdge, p); // bottom-left
    vec2 tr = smoothstep(innerEdge, outerEdge, 1.0 - p); // top-right
    return vec3(bl.x * bl.y * tr.x * tr.y);
}

vec3 waves(vec2 p, float xWiggleRate, float yWiggleRate, float xFrequency, float yFrequency, float xWiggle, float yWiggle) {
    xFrequency += sin(iTime * xWiggleRate);
    yFrequency += sin(iTime * yWiggleRate);
    return vec3(cos(xFrequency * (p.x + xWiggle * sin(p.y))) * cos(yFrequency * (p.y + yWiggle * cos(p.y))));
}

float glow(vec2 p) {
    vec2 pn = p * 2.0 - 1.0;

    float glowScalar = 2.0;
    float glowAdder = 0.0;

    float fadeFrequency = 1.0;
    float glowColor = glowAdder + (1.0 - length(pn)) * glowScalar - (0.5 * sin(fadeFrequency * iTime) + 0.5);
    return clamp(glowColor, 0.0, 1.0);
}

float sinSpeeding(float position, float offset) {
    float speed = 100.0 * smoothstep(3.0, 100.0, position);
    return sin(0.01 * position * speed + offset);
}

void mainImage( out vec4 fragColor, in vec2 fragCoord )
{
    // position on screen
    vec2 p = fragCoord.xy / iResolution.xy;

    // rectangle masks
    vec3 mask1 = blurry_rectangle(p, 0.4, 0.125, 0.02, 0.02, 0.3 * sinSpeeding(iTime, 0.0), 0.0);
    vec3 mask2 = blurry_rectangle(p, 0.4, 0.125, 0.02, 0.02, 0.3 * sinSpeeding(iTime, 2.0 * pi / 3.0), 0.0);
    vec3 mask3 = blurry_rectangle(p, 0.4, 0.125, 0.02, 0.02, 0.3 * sinSpeeding(iTime, 4.0 * pi / 3.0), 0.0);

    // inside the blurry rectangle
    vec3 color1 = waves(p, 0.2, 0.2, 10.0, 10.0, 5.0, 5.0);
    vec3 color2 = waves(p, 0.1, 0.1, 2.0, 1.0, 100.0, 5.0);
    vec3 color3 = waves(p, 0.1, 0.1, 2.0, 5.0, 1.0, 5.0);

    float glowVal = glow(p);
    fragColor = vec4(mask1 * color1 + mask2 * color2 + mask3 * color3, 1.0) * vec4(0.8 * glowVal, 0.2 * glowVal, 1.0, 1.0);
        }
Adding a new custom effect for the shader
First, you need to add a new custom effect to your composition in Effect Composer. Later, you will copy the shader code to this custom effect.
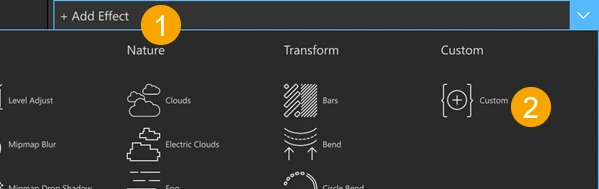
To add a custom effect to your composition:
- In Qt Design Studio, open the Effect Composer view.
- From the Add Effect dropdown menu (1), select Custom (2). The custom effect node is an empty effect node.
Copying the shader code to Shaders Code Editor
Next, you will copy the shader code and paste it to the Fragment Shader tab of Shaders Code Editor:
- Select Show Code.
- Copy the functions of the shader and paste them before the
@maintag:const float pi = 3.14159265; vec3 blurry_rectangle(vec2 p, float xEdgeWidth, float yEdgeWidth, float xBlurriness, float yBlurriness, float xOffset, float yOffset) { // the blurry rectangle mask p -= vec2(xOffset, yOffset); float smoothFrequency = 1.0; vec2 innerEdge = vec2(xEdgeWidth, yEdgeWidth) - vec2(xBlurriness, yBlurriness); vec2 outerEdge = vec2(xEdgeWidth, yEdgeWidth) + vec2(xBlurriness, yBlurriness); vec2 bl = smoothstep(innerEdge, outerEdge, p); // bottom-left vec2 tr = smoothstep(innerEdge, outerEdge, 1.0 - p); // top-right return vec3(bl.x * bl.y * tr.x * tr.y); } vec3 waves(vec2 p, float xWiggleRate, float yWiggleRate, float xFrequency, float yFrequency, float xWiggle, float yWiggle) { xFrequency += sin(iTime * xWiggleRate); yFrequency += sin(iTime * yWiggleRate); return vec3(cos(xFrequency * (p.x + xWiggle * sin(p.y))) * cos(yFrequency * (p.y + yWiggle * cos(p.y)))); } float glow(vec2 p) { vec2 pn = p * 2.0 - 1.0; float glowScalar = 2.0; float glowAdder = 0.0; float fadeFrequency = 1.0; float glowColor = glowAdder + (1.0 - length(pn)) * glowScalar - (0.5 * sin(fadeFrequency * iTime) + 0.5); return clamp(glowColor, 0.0, 1.0); } float sinSpeeding(float position, float offset) { float speed = 100.0 * smoothstep(3.0, 100.0, position); return sin(0.01 * position * speed + offset); } @main { }
- Copy the code inside
mainImageand paste it after the@maintag, inside {}:const float pi = 3.14159265; vec3 blurry_rectangle(vec2 p, float xEdgeWidth, float yEdgeWidth, float xBlurriness, float yBlurriness, float xOffset, float yOffset) { // the blurry rectangle mask p -= vec2(xOffset, yOffset); float smoothFrequency = 1.0; vec2 innerEdge = vec2(xEdgeWidth, yEdgeWidth) - vec2(xBlurriness, yBlurriness); vec2 outerEdge = vec2(xEdgeWidth, yEdgeWidth) + vec2(xBlurriness, yBlurriness); vec2 bl = smoothstep(innerEdge, outerEdge, p); // bottom-left vec2 tr = smoothstep(innerEdge, outerEdge, 1.0 - p); // top-right return vec3(bl.x * bl.y * tr.x * tr.y); } vec3 waves(vec2 p, float xWiggleRate, float yWiggleRate, float xFrequency, float yFrequency, float xWiggle, float yWiggle) { xFrequency += sin(iTime * xWiggleRate); yFrequency += sin(iTime * yWiggleRate); return vec3(cos(xFrequency * (p.x + xWiggle * sin(p.y))) * cos(yFrequency * (p.y + yWiggle * cos(p.y)))); } float glow(vec2 p) { vec2 pn = p * 2.0 - 1.0; float glowScalar = 2.0; float glowAdder = 0.0; float fadeFrequency = 1.0; float glowColor = glowAdder + (1.0 - length(pn)) * glowScalar - (0.5 * sin(fadeFrequency * iTime) + 0.5); return clamp(glowColor, 0.0, 1.0); } float sinSpeeding(float position, float offset) { float speed = 100.0 * smoothstep(3.0, 100.0, position); return sin(0.01 * position * speed + offset); } @main { // position on screen vec2 p = fragCoord.xy / iResolution.xy; // rectangle masks vec3 mask1 = blurry_rectangle(p, 0.4, 0.125, 0.02, 0.02, 0.3 * sinSpeeding(iTime, 0.0), 0.0); vec3 mask2 = blurry_rectangle(p, 0.4, 0.125, 0.02, 0.02, 0.3 * sinSpeeding(iTime, 2.0 * pi / 3.0), 0.0); vec3 mask3 = blurry_rectangle(p, 0.4, 0.125, 0.02, 0.02, 0.3 * sinSpeeding(iTime, 4.0 * pi / 3.0), 0.0); // inside the blurry rectangle vec3 color1 = waves(p, 0.2, 0.2, 10.0, 10.0, 5.0, 5.0); vec3 color2 = waves(p, 0.1, 0.1, 2.0, 1.0, 100.0, 5.0); vec3 color3 = waves(p, 0.1, 0.1, 2.0, 5.0, 1.0, 5.0); float glowVal = glow(p); fragColor = vec4(mask1 * color1 + mask2 * color2 + mask3 * color3, 1.0) * vec4(0.8 * glowVal, 0.2 * glowVal, 1.0, 1.0); }
You should now see the effect in the preview window of the Effect Composer view:
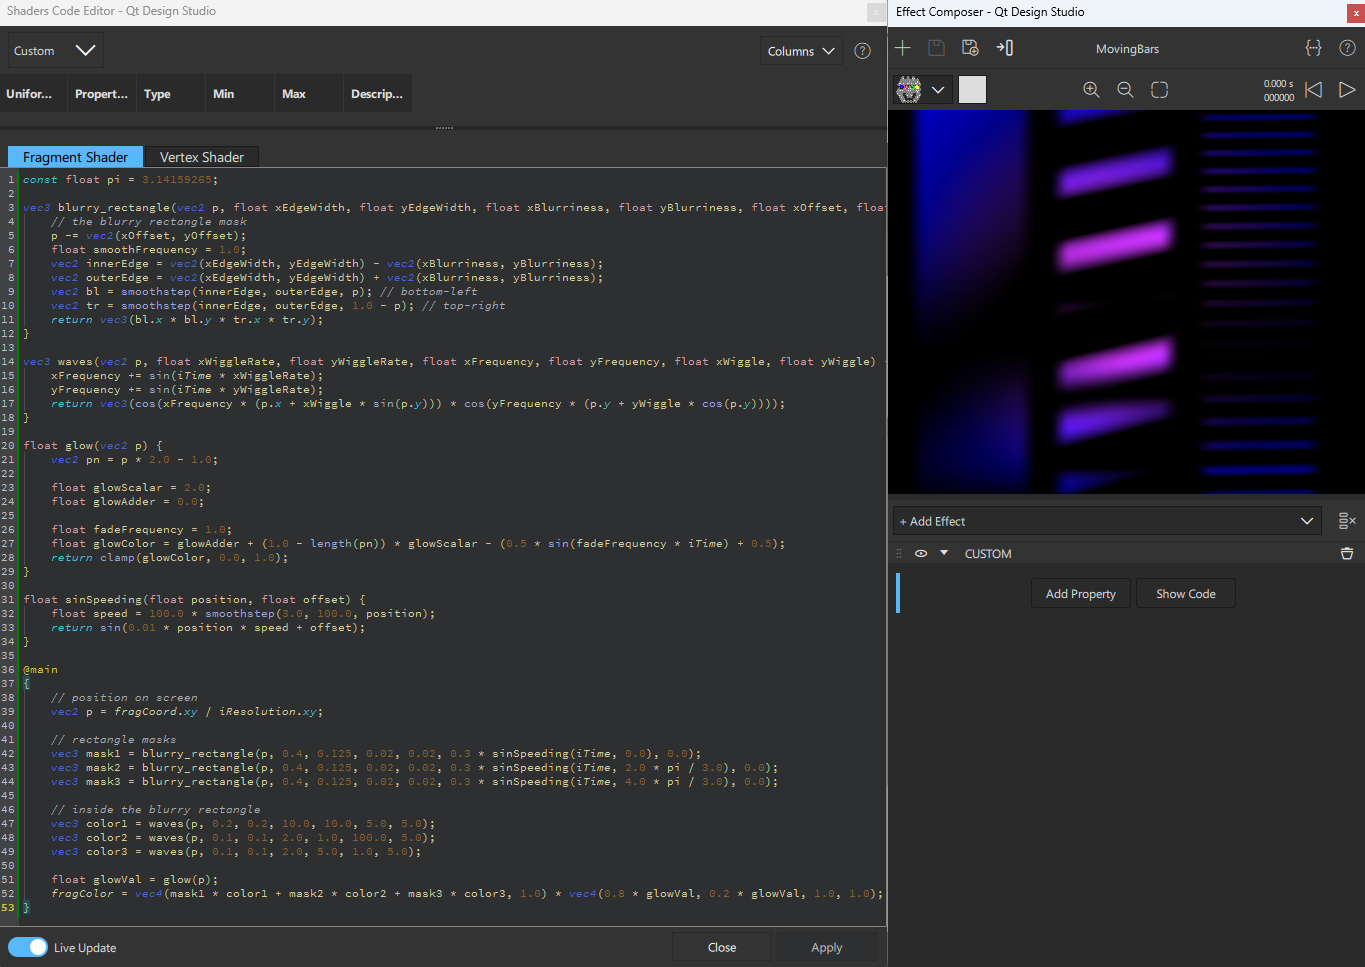
If you don't see the effect, ensure that Live Update is selected. To update the preview window manually, select Apply.
Select  to run the animation in the preview window.
Using the new effect composition in your project
To add the effect to a component in your project, see Assigning an effect composition to a component.
See also Effect Composer, Effect Composer example, and Working with shader code in Effect Composer.
Available under certain Qt licenses.
Find out more.
